MySQL source code reading 1 - get ready
Introduction
Began to read MySQL server source code. I'll write down what I read and what I understand to keep them in my mind. (Too complex for me to remember without any memorandum...)
First of all, I wrote how I prepared to read the code.
MySQL internal manual
Reference
I use this book.

Understanding MySQL Internals: Discovering and Improving a Great Database (English Edition)
- 作者: Sasha Pachev
- 出版社/メーカー: O'Reilly Media
- 発売日: 2009/02/09
- メディア: Kindle版
- この商品を含むブログ (3件) を見る
Damn, not sure but this blog won't display the original version here. So, I'll put translated version as well, just in case.

- 作者: Sasha Pachev,吉川英興,田中慎司,伊藤直也,菅野良二
- 出版社/メーカー: オライリー・ジャパン
- 発売日: 2007/11/20
- メディア: 大型本
- 購入: 4人 クリック: 86回
- この商品を含むブログ (24件) を見る
If your local amazon is the US amazon, see http://www.amazon.com/dp/0596009577/
How to get the source code
Written in the internal manual.
How to generate the document of the source code
See Doxyfile-perfschema in the source code directory.
How to see the source code on Web
This is one of the web sites you can see the code. It has search function which may help you.
How to build and install MySQL server
Written in the internal manual.
How to configure mysqld
Copy my.cnf to ~/.my.cnf and then modify it. I added two lines to easily boot. /home/takahiro/mysql-bin is the built server directory.
# These are commonly set, remove the # and set as required.
basedir=/home/takahiro/mysql-bin
datadir=/home/takahiro/mysql-bin/var
How to use debugger
Written in the internal manual.
Run mysqld with gdb on a terminal window.
$ gdb mysqld
Then run mysql client on another terminal window.
$ mysql
Storage
I use MyISAM for now. Because it looks more straightforward than Innodb. The problem of MyISAM is that transaction seems not work on it. When I read transaction related code, I might switch storage from MyISAM to Innodb.
Add the following line in ~/.my.cnf to use MyISAM as default storage.
[mysqld]
default-storage-engine=MyISAM
Sample tables
I made two tables for my code reading.
mysql> show tables;
+----------------+
| Tables_in_test |
+----------------+
| a              |
| b              |
+----------------+
2 rows in set (0.00 sec)

mysql> show columns from a;
+-------+---------+------+-----+---------+-------+
| Field | Type    | Null | Key | Default | Extra |
+-------+---------+------+-----+---------+-------+
| id    | int(11) | YES  |     | NULL    |       |
| b_id  | int(11) | YES  |     | NULL    |       |
+-------+---------+------+-----+---------+-------+
2 rows in set (0.01 sec)

mysql> show columns from b;
+-------+---------+------+-----+---------+-------+
| Field | Type    | Null | Key | Default | Extra |
+-------+---------+------+-----+---------+-------+
| id    | int(11) | YES  |     | NULL    |       |
| val   | int(11) | YES  |     | NULL    |       |
+-------+---------+------+-----+---------+-------+
2 rows in set (0.00 sec)

mysql> select * from a;
+------+------+
| id   | b_id |
+------+------+
|    1 |    1 |
|    2 |    2 |
|    3 |    3 |
|    4 |    4 |
|    5 |    5 |
|    6 |    1 |
|    7 |    2 |
|    8 |    3 |
|    9 |    4 |
|   10 |    5 |
+------+------+
10 rows in set (0.80 sec)

mysql> select * from b;
+------+------+
| id   | val  |
+------+------+
|    1 |    0 |
|    2 |    1 |
|    3 |    2 |
|    4 |    3 |
|    5 |    4 |
+------+------+
5 rows in set (0.67 sec)
Raw files
takahiro@ubuntu:~/mysql-bin/var/test$ hexdump -C a.MYD
00000000  f9 01 00 00 00 01 00 00  00 f9 02 00 00 00 02 00  |................|
00000010  00 00 f9 03 00 00 00 03  00 00 00 f9 04 00 00 00  |................|
00000020  04 00 00 00 f9 05 00 00  00 05 00 00 00 f9 06 00  |................|
00000030  00 00 01 00 00 00 f9 07  00 00 00 02 00 00 00 f9  |................|
00000040  08 00 00 00 03 00 00 00  f9 09 00 00 00 04 00 00  |................|
00000050  00 f9 0a 00 00 00 05 00  00 00                    |..........|
0000005a
takahiro@ubuntu:~/mysql-bin/var/test$ hexdump -C b.MYD
00000000  f9 01 00 00 00 00 00 00  00 f9 02 00 00 00 01 00  |................|
00000010  00 00 f9 03 00 00 00 02  00 00 00 f9 04 00 00 00  |................|
00000020  03 00 00 00 f9 05 00 00  00 04 00 00 00           |.............|
0000002d
test is the boring database name for the code reading.
You see that 9 bytes are used for a row. The first byte in the 9 bytes is flag. The following two 4 bytes are the integer values. Recall columns in the table.
Conclusion
I'm ready to read the MySQL server code. I'll read simple query processing next.
Easy Rapid serial visual presentation implementation with JavaScript.
Introduction
I implemented easy RSVP(Rapid Serial Visual Presentation) with JavaScript because I was inspired by Spritz(http://www.spritzinc.com/).
RSVP is one of the common high speed reading technique.
You can see the detail of RSVP and Spritz at Spritz Blog, especially about how Spritz is enhanced from usual RSVP.
http://www.spritzinc.com/blog/
And you can try Spritz(not usual RSVP) at Spritz web site and you can understand what they're.
Features of this implementation
- you can use RSVP anytime on your web browser with the words which you see on the browser
- very easy to use
Source code
var wpm = 500;
var zIndex = 2000;
var bgColor = '#ffffff';
var fontColor = '#000000';

function mouseupHandler() {
  var range = document.getSelection();
  var selection = range.toString();

  if(! selection)
    return;

  selection = selection.replace(/^\s*/, '').replace(/\s*$/, '');

  if(selection == '')
    return;

  var strs = selection.split(/\s+/);
  display(strs);
}

function display(strs) {
  var str = strs.shift();
  span.innerHTML = str;
//  console.log(str);
  if(strs.length > 0)
    setTimeout(function(){display(strs)}, 60*1000/wpm);
}

document.addEventListener('mouseup', mouseupHandler, false);
var span = document.createElement('span');
span.style.position = 'fixed';
span.style.top = 0;
span.style.right = 0;
span.style.left = 0;
span.style.textAlign = 'center';
span.style.zIndex = zIndex;
span.style.backgroundColor = bgColor;
span.style.fontColor = fontColor;
document.body.appendChild(span);
How to use
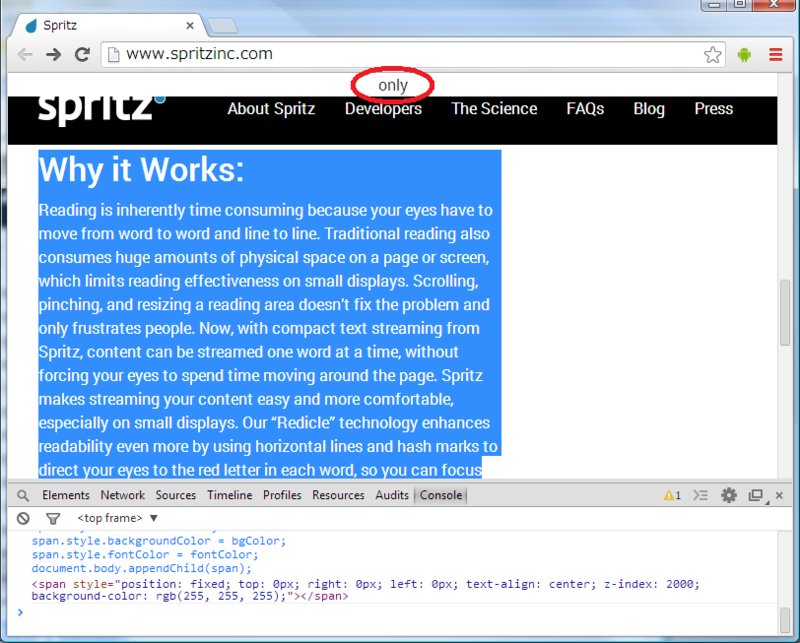
I expect this script is used on the combination of Windows and Chrome. I'm not sure it works on the other environment.
- Open JavaScript Console(press Shift+Ctrl+J or select tool->JavaScript console from right-top button if you use Chrome).
- Copy and Paste the above source code into your console, and then press enter.
- Select(Drag) the strings which you wanna use.
- The words will be displayed one by one in high speed(default is 500 wpm) at the top-center of your browser.
Conclusion
I implemented a simple RSVP implementation with JavaScript. It's very easy to use and you can practice high-speed reading with RSVP anytime, with the words you see now.
I may make a Chrome extension with this script, but I suppose if a much better RSVP extension exists.
Anyways, I hope Spritz technique will be available anywhere soon because it seems much more improved than usual RSVP.
How to reduce GC processing on real time JavaScript game.
Introduction
You know, I've been implementing a STG with JavaScript and HTML5. (This article follows the previous article http://d.hatena.ne.jp/takahirox/20130819/1376894048)
Recently, the low performance of the STG was getting serious, therefore I got the profile. I found the GC was one of the most heavy processings (though the heaviest processing is canvas drawing), and I attempted to reduce GC occurrence.
In this article, I'll show you what I did to reduce GC and how it worked well.
Play and video
First, I'll let you know the latest and older version of the game and the video. You can understand what I've been implementing. In the latest one has low GC implementation, while the older one doesn't it and GC occurs a lot.
You can register your playing to the server in the latest version and let the other players see your playing! Try it!
the latest one
http://takahirox.github.io/toho-like-js/index.html (Click this link to play! You can play this game on your chrome.)
Before (Bad code)
Then, I'll show you the older code which made GC happen a lot. This class, named ElementManager, manages almost all elements of my STG, like fighter, bullet, enemies, and so on.
// Note that I simplified this code to let you easily understand.
function ElementManager( ) {
  this.elements = [ ] ;
} ;


ElementManager.prototype.reset = function( ) {
  this.elements = [ ] ;
} ;


// Element is the class represents an element of my STG.
ElementManager.prototype.create = function( ) {
  this.elements.push( new Element( ) ) ;
} ;


// This function removes dead elements.
ElementManager.prototype.checkLoss = function( callback ) {
  var elements = [ ] ;
  for( var i = 0; i < this.elements.length; i++ ) {
    if( ! this.elements[ i ].isDead( ) ) {
      elements.push( this.elements[ i ] ) ;
    }
  }
  this.elements = elements ;
} ;
You know, in STG much many elements appear. They are generated, deleted, generated, deleted... much many elements are repeatedly generated and deleted.
I mean, this is the main resource management logic. I expected JavaScript automatically allocate and free memory well, so I didn't care them by myself at all, as you see in the code.
After (Good code)
I read this document when I decided to reduce GC processing.
- How to write low garbage real-time JavaScript
I'll quote the most important technique written in this document. (In this document, you can see many useful techniques. I recommend you to read through it.)
Where possible, try to create the object on startup, and simply re-use the same object for as long as possible.
I changed the memory management strategy. I decided to manage memory by myself. I wrote an abstract memory(element=object) management class, named FreeList.
/**
 * This class manages object resources to reduce GC.
 */
function FreeList( num ) {
  this.num = num ;
  this.head = null ;
  this.tail = null ;
  this.list = [ ] ;
  this._init( ) ;
}


FreeList.prototype._init = function( ) {
  // Just in case.
  if( this.num <= 0 )
    return ;
  for( var i = 0; i < this.num; i++ ) {
    var element = this._generateElement( ) ;
    element.listId = i ; // compulsorily add a property.
    this.list.push( { 'element': element, 'listForw': null, 'available': true } ) ;
    if( i > 0 )
      this.list[ i - 1 ].listForw = this.list[ i ] ;
  }
  this.head = this.list[ 0 ] ;
  this.tail = this.list[ this.num - 1 ] ;
} ;


/**
 * Child class must override this method.
 */
FreeList.prototype._generateElement = function( ) {
  return { } ;
} ;


/**
 * TODO: must implement the proper object shortage handler.
 * TODO: verify the functionality.
 */
FreeList.prototype.get = function( ) {
  if( this.head == null ) {
    window.alert( 'ran out of object resources.' ) ;
    throw new Error( 'ran out of object resources.' ) ;
  }
  var head = this.head ;
  this.head = head.listForw ;
  head.available = false ;
  head.listForw = null ;
  if( this.head == null )
    this.tail = null ;
  return head.element ;
} ;


FreeList.prototype.free = function( element ) {
  this.list[ element.listId ].available = true ;
  if( this.tail != null )
    this.tail.listForw = this.list[ element.listId ] ;
  this.tail = this.list[ element.listId ] ;
  if( this.head == null )
    this.head = this.tail ;
} ;
The FreeList has an element list. Outer class uses get( ) to get an object from the element list and free( ) to return an object to the element list. As you see, objects are generated only once (I mean memory allocation for elements occurs only once) when the FreeList instance is generated. And also, the FreeList keeps freed objects in the element list. So, you can reuse objects.
And, I modified the ElementManager to use FreeList.
// Note that I simplified this code to let you easily understand.
/**
 * Utility function for inherit.
 */
function __inherit( child, parent ) {
  var getPrototype = function( p ) {
    if( Object.create ) {
      return Object.create( p ) ;
    }
    function f( ) { } ;
    f.prototype = p ;
    return new f( ) ;
  } ;
  child.prototype = getPrototype( parent.prototype ) ;
  child.prototype.constructor = child ;
}


function ElementFreeList( num ) {
  FreeList.call( this, num ) ;
}
__inherit( ElementFreeList, FreeList ) ;


ElementFreeList.prototype._generateElement = function( ) {
  return new Element( ) ;
} ;


function ElementManager( ) {
  this.elements = [ ] ;
  this.freelist = new ElementFreeList( 1000 ) ;
} ;


ElementManager.prototype.reset = function( ) {
  for( var i = 0; i < this.elements.length; i++ ) {
    this.freelist.free( this.elements[ i ] ) ;
  }
  this.elements.length = 0 ;
} ;


ElementManager.prototype.create = function( ) {
  var e = this.freelist.get( ) ;
  e.init( ) ; // initialize Element
  this.elements.push( e ) ;
} ;


// A technique written in the above document is used,
// that is to change length properties.
ElementManager.prototype.checkLoss = function( callback ) {
  var j = 0 ;
  for( var i = 0; i < this.elements.length; i++ ) {
    if( ! this.elements[ i ].isDead( ) ) {
      this.elements[ i - j ] = this.elements[ i ] ;
    } else {
      this.freelist.free( this.elements[ i ] ) ;
      j++ ;
    }
  }
  this.elements.length -= j ;
} ;
Comparison
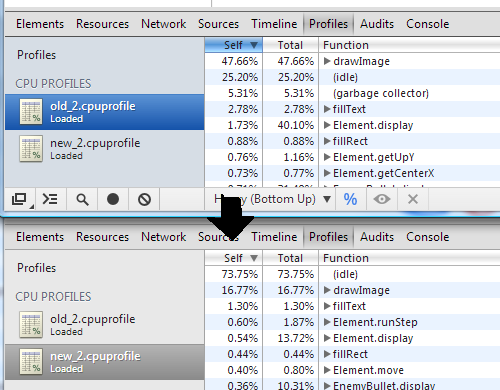
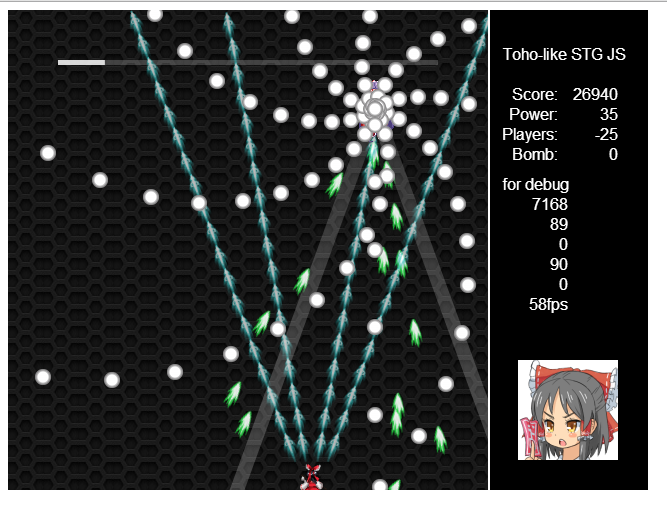
I compared the new implementation with the old one by seeing CPU profile. I used the 2nd stage boss bullets pattern for the comparison because its bullet number is around 400(see the circle of the following image) which is the currently most greatest number in my STG. I mean, Element generation and deletion happen a lot.
This is the (partial) result. The top one is the older one result, and the bottom one is the newer one.
You can see that CPU spent around 5% for GC and idle time is only 25% in the older one. But, GC didn't occur in the newer one and idle time much increased, that is 73%. This idle time increase is much important to be stable running on 60FPS.
When you see this result number, be careful that I modified the entire source code not only to use new ElementManager and FreeList, but also to prevent new memory allocation in many parts as fine tune.
And this result is just on my environment. On your environment, the result number can change.
Conclusion
I implemented low GC STG which manages memory by myself. It reduced GC processing a lot and much increased idle time.
I confirmed the memory reuse technique works well to implement low GC game.
Probably, this is the basic and well-known technique. But it's interesting that you can see the actual number on the actual game, isn't it?
The following is the Japanese translation of this article.
Introduction
JavaScriptとHTML5でSTGを作っています。(このエントリは前のエントリの続き http://d.hatena.ne.jp/takahirox/20130819/1376894048)
処理の重さが最近問題になってきたので、プロファイルを取得しました。GCが一つの重い処理だということがわかったので、GCの発生を減少させる試みを行いました。(一番重い処理は描画処理なんだけれども)
このエントリでは、GCの発生を減少させるために行ったことと、それが如何によく効いたかを紹介します。
Play and video
最初に、最新版とその前のバージョンのSTGとその動画を紹介します。私が何を作っているのかがわかるでしょう。最新版ではGC減少ロジックが実装されています。前のバージョンでは実装されておらず、GCがたくさん発生します。
ところで、最新版ではあなたのプレイがサーバに登録でき、他プレイヤーにそのプレイを見せることができるので、お試しあれ。
the latest one
http://takahirox.github.io/toho-like-js/index.html (Click this link to play! You can play this game on your chrome.)
Before (Bad code)
次に、GCをたくさん発生していた古いバージョンのソースコードを紹介します。このElementManagerクラスは、STG中のほぼ全ての要素(自機、弾、敵など)を管理するクラスです。
// Note that I simplified this code to let you easily understand.
function ElementManager( ) {
  this.elements = [ ] ;
} ;


ElementManager.prototype.reset = function( ) {
  this.elements = [ ] ;
} ;


// Element is the class represents an element of my STG.
ElementManager.prototype.create = function( ) {
  this.elements.push( new Element( ) ) ;
} ;


// This function removes dead elements.
ElementManager.prototype.checkLoss = function( callback ) {
  var elements = [ ] ;
  for( var i = 0; i < this.elements.length; i++ ) {
    if( ! this.elements[ i ].isDead( ) ) {
      elements.push( this.elements[ i ] ) ;
    }
  }
  this.elements = elements ;
} ;
STGではたくさんの要素が画面上に現れます。それらは生成され、削除され、生成され、削除され……と、生成と削除を繰り返します。
つまり、このクラスはメインのリソース管理ロジックです。JavaScriptは自動的にメモリの割当てと解放を効率的に行ってくれると期待していたので、コードを見てわかるように、全く自分自身ではメモリ管理を考慮していませんでした。
After (Good code)
GCの発生を減らすと決めたとき、このドキュメントを読みました。
- How to write low garbage real-time JavaScript
最も重要なテクニックを引用します。(このドキュメントには有用なテクニックがたくさんかかれているので、一度目を通すことをお勧めします)
Where possible, try to create the object on startup, and simply re-use the same object for as long as possible.
メモリの管理方法を変え、自分自身で管理することに決めました。FreeListと呼ばれるメモリ(要素=オブジェクト)管理クラスを書きました。
/**
 * This class manages object resources to reduce GC.
 */
function FreeList( num ) {
  this.num = num ;
  this.head = null ;
  this.tail = null ;
  this.list = [ ] ;
  this._init( ) ;
}


FreeList.prototype._init = function( ) {
  // Just in case.
  if( this.num <= 0 )
    return ;
  for( var i = 0; i < this.num; i++ ) {
    var element = this._generateElement( ) ;
    element.listId = i ; // compulsorily add a property.
    this.list.push( { 'element': element, 'listForw': null, 'available': true } ) ;
    if( i > 0 )
      this.list[ i - 1 ].listForw = this.list[ i ] ;
  }
  this.head = this.list[ 0 ] ;
  this.tail = this.list[ this.num - 1 ] ;
} ;


/**
 * Child class must override this method.
 */
FreeList.prototype._generateElement = function( ) {
  return { } ;
} ;


/**
 * TODO: must implement the proper object shortage handler.
 * TODO: verify the functionality.
 */
FreeList.prototype.get = function( ) {
  if( this.head == null ) {
    window.alert( 'ran out of object resources.' ) ;
    throw new Error( 'ran out of object resources.' ) ;
  }
  var head = this.head ;
  this.head = head.listForw ;
  head.available = false ;
  head.listForw = null ;
  if( this.head == null )
    this.tail = null ;
  return head.element ;
} ;


FreeList.prototype.free = function( element ) {
  this.list[ element.listId ].available = true ;
  if( this.tail != null )
    this.tail.listForw = this.list[ element.listId ] ;
  this.tail = this.list[ element.listId ] ;
  if( this.head == null )
    this.head = this.tail ;
} ;
FreeListはリストを持ちます。外部クラスは、オブジェクトをリストから取得するためにget()を使用し、オブジェクトをリストに返すためにfree()を使用します。
見てわかるように、オブジェクトの生成はFreeListインスタンス生成時に一度しか行われません(つまり、オブジェクトのためのメモリ割当はインスタンス生成時に一度しか行われません)。そして、FreeListは返されたオブジェクトもリストにキープしておきます。よって、オブジェクトの再利用が可能となります。
FreeListを使うようにElementManagerを修正しました。
// Note that I simplified this code to let you easily understand.
/**
 * Utility function for inherit.
 */
function __inherit( child, parent ) {
  var getPrototype = function( p ) {
    if( Object.create ) {
      return Object.create( p ) ;
    }
    function f( ) { } ;
    f.prototype = p ;
    return new f( ) ;
  } ;
  child.prototype = getPrototype( parent.prototype ) ;
  child.prototype.constructor = child ;
}


function ElementFreeList( num ) {
  FreeList.call( this, num ) ;
}
__inherit( ElementFreeList, FreeList ) ;


ElementFreeList.prototype._generateElement = function( ) {
  return new Element( ) ;
} ;


function ElementManager( ) {
  this.elements = [ ] ;
  this.freelist = new ElementFreeList( 1000 ) ;
} ;


ElementManager.prototype.reset = function( ) {
  for( var i = 0; i < this.elements.length; i++ ) {
    this.freelist.free( this.elements[ i ] ) ;
  }
  this.elements.length = 0 ;
} ;


ElementManager.prototype.create = function( ) {
  var e = this.freelist.get( ) ;
  e.init( ) ; // initialize Element
  this.elements.push( e ) ;
} ;


// A technique written in the above document is used,
// that is to change length properties.
ElementManager.prototype.checkLoss = function( callback ) {
  var j = 0 ;
  for( var i = 0; i < this.elements.length; i++ ) {
    if( ! this.elements[ i ].isDead( ) ) {
      this.elements[ i - j ] = this.elements[ i ] ;
    } else {
      this.freelist.free( this.elements[ i ] ) ;
      j++ ;
    }
  }
  this.elements.length -= j ;
} ;
Comparison
CPUプロファイルを取ることで、新しい実装と古い実装の比較を行いました。2面ボスの弾パターンを比較の題材としました。その理由は、画面上に約400発の弾が現れ(下図の白丸参照)、その400という数字はこのSTGの中で一番大きい数字だからです。つまり、要素の生成と削除が最も行われるということです。
これが比較結果(の一部分)です。上が古い実装で、下が新しい実装のものです。
古い実装では、CPUは約5%をGCに費やし、またアイドルタイムはたったの25%です。一方新しい実装では、GCが発生せず、アイドルタイムも73%まで増加しました。このアイドルタイムの増加は、安定して60FPSを出すためにとても必要です。
この改善度を見るとき、新しいElementManagerとFreeListの使用だけでなく、新たなメモリ獲得を防ぐようにソースコード全体で細かいチューンも行ったことには注意してください。
また、この比較結果は私の環境での結果です。環境によってはこの数字は変わってくるかもしれません。
I implemented a STG with JavaScript and HTML5 in a week.
Introduction
Suddenly I felt I wanna implement a STG. So, I implemented it with JavaScript and HTML5 in a week. I'll introduce you it here.
Play
You can play it here.
http://takahirox.github.io/toho-like-js/index.html
(Be careful that the sound will come out.)
Note that I confirmed only it runs on the combination of Windows and chrome. Also it can run on the combination of Android and chrome if you have a bluetooth keyboard, but it's very very slow. I have no idea whether it runs on the other environment or not.
Video
Future work
I just implemented a STG engine. I didn't implement an actual enemy map, proper parameters, stages, opening, ending, and so on. I guess the current game is not so excited. Please wait 'til I implement them.
Conclusion
I'd be very pleased if you'd enjoy my STG on your web browser!
はじめに
突然シューティングゲームを作ってみたくなったので、JavaScriptとHTML5を用いて一週間で作ってみました。ここではその紹介をします。
プレイ
ここでプレイできます。
http://takahirox.github.io/toho-like-js/index.html
(音が出るので注意)
Windows & Chromeのみで動作確認を行いました。Bluetoothキーボードがあれば、Android & Chromeでも遊べるのですが、とても遅いです。他の環境で動くかどうかはわかりません。
Video
Future work
まだゲームエンジンを作っただけです。敵の配置や、適切なパラメータの設定や、オープニング・エンディングなどなどはこれから実装していく予定です。
なので、現在の状態ではあまり面白くないと思います。作り終わったらまた遊んでみてください。
I published the PDP-11 Emulator implemented with JavaScript.
Introduction
This entry follows the last entry.
http://d.hatena.ne.jp/takahirox/20130707/1373178742
I'll introduce my PDP11 emulator implemented with JavaScript because I almost achieved it.
PDP-11 Emulator implemented with JavaScript
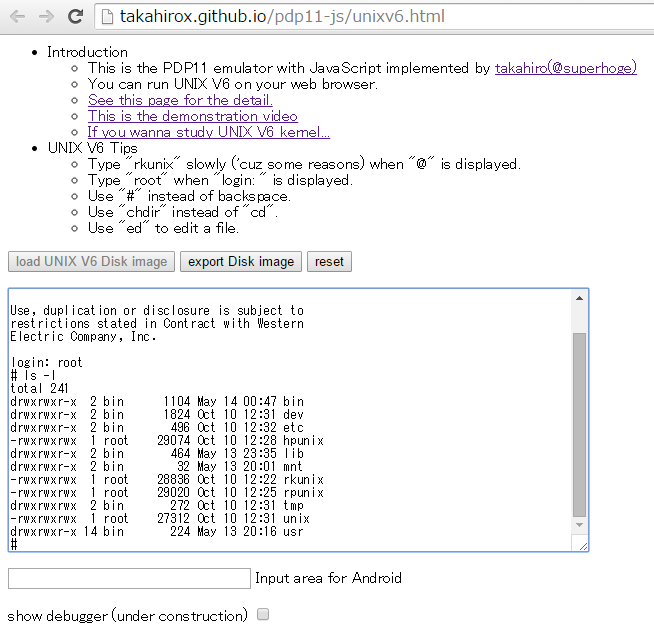
You can run UNIX V6 on your web browser here. (Note that I confirmed only it runs on the combination of Windows and Chrome.)
http://takahirox.github.io/pdp11-js/unixv6.html
This is not a server application, but a local application. The PDP11 emulator actually runs on your local web browser.
source code
You can see the source code here. (The code is very dirty yet and I should do refactoring!)
Demonstration
You can see the demonstration video here.
Screen shot
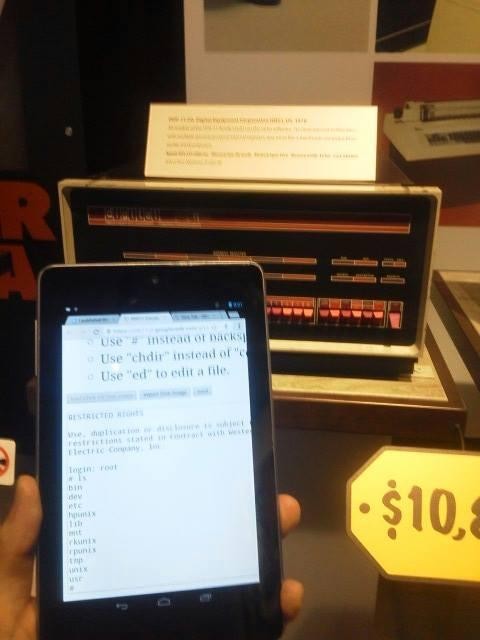
This is the pic that my PDP-11 emulator runs on Android Chrome in front of the physical PDP-11 at computer history museum.
Objectives
This is mainly for education. I published the book about UNIX V6 kernel source code.
I published the book about UNIX 6th Edition in Japan.

はじめてのOSコードリーディング ~UNIX V6で学ぶカーネルのしくみ (Software Design plus)
- 作者: 青柳隆宏
- 出版社/メーカー: 技術評論社
- 発売日: 2013/01/09
- メディア: 単行本(ソフトカバー)
- 購入: 56人 クリック: 1,959回
- この商品を含むブログ (29件) を見る
I wanna let readers easily see the running UNIX V6. I believe that they can enjoy this emulator because, for example, they can see what's happened while the computer system is running.
Conclusion
I didn't fix it yet. I'm gonna add some more features, like debugger. Thanks.
はじめに
このエントリはこの前の続きです。
http://d.hatena.ne.jp/takahirox/20130707/1373178742
だいぶできてきたので、JavaScriptで実装したPDP11エミュレータを改めて紹介します。
PDP-11 Emulator implemented with JavaScript
こちらのリンク先で、お使いのブラウザ上でUNIX V6を動かすことができます。(Windows & Chromeでのみ動作確認しています)
http://takahirox.github.io/pdp11-js/unixv6.html
これはサーバアプリケーションではありません。ローカルアプリケーションです。PDP11エミュレータが、実際にあなたのブラウザ上で動きいます。
Demonstration
PDP11エミュのデモ動画です。
Objectives
教育用に作りました。UNIX V6の解説本を出版していまして、
I published the book about UNIX 6th Edition in Japan.

はじめてのOSコードリーディング ~UNIX V6で学ぶカーネルのしくみ (Software Design plus)
- 作者: 青柳隆宏
- 出版社/メーカー: 技術評論社
- 発売日: 2013/01/09
- メディア: 単行本(ソフトカバー)
- 購入: 56人 クリック: 1,959回
- この商品を含むブログ (29件) を見る
読者の人に気軽にUNIX V6を体験してもらいたいと思ったのです。コンピュータシステムが動いているときに、コンピュータ内部で何が起きているのかが見れるので、きっと楽しめるでしょう。
Conclusion
まだ開発は終了していません。デバッガなどの機能を追加していく予定です。
PDP-11 Emulator implemented with JavaScript.
Introduction
Hi, it's been a while.
I'll show you what I implemented recently today.
PDP-11 Emulator implemented with JavaScript
2013/07/22
2013/07/21
2013/07/09
2013/07/07
I implemented a PDP-11 Emulator with JavaScript. You can see on the video that UNIX 6th Edition runs on a web browser.
I didn't implement whole features yet and I know there are a lot of bugs. And also I need to make it much faster. Unless I do it, it takes a much time to run, especially for initializing memory...
After I fix them, I'm gonna show you the emulator again. And I'm gonna publish the source code.
(Note that, what I made before is not an emulator, but an UNIX 6th Edition a.out interpreter.)
Objectives
As you know, I published the book about UNIX 6th Edition in Japan.

はじめてのOSコードリーディング ~UNIX V6で学ぶカーネルのしくみ (Software Design plus)
- 作者: 青柳隆宏
- 出版社/メーカー: 技術評論社
- 発売日: 2013/01/09
- メディア: 単行本(ソフトカバー)
- 購入: 56人 クリック: 1,959回
- この商品を含むブログ (29件) を見る
I wanna let you easily see the running UNIX 6th Edition. I think the stuff where you can run it on your web browser is one of nice ideas, isn't it?
And I wanna understand a whole computer system. Developing an emulator is one of nice ways to do that, I think.
Link
- http://pdp11.aiju.de/
- An much greater PDP-11 emulator implemented with JavaScript than my one.
はじめに
どうもお久しぶりです。今日は最近作ったものをお見せします。
PDP-11 Emulator implemented with JavaScript
2013/07/22
2013/07/21
2013/07/09
2013/07/07
PDP-11エミュレータをJavaScriptで実装しました。動画中で、UNIX 6th Editionがブラウザ上で動作しているのを見ることができます。
まだ全ての機能を実装しておらず、また、バグがたくさん含まれています。それに、動作をもっと早くしないといけません。特に、メモリの初期化に時間を喰うので……
それらを全て終えた後、またエミュレータをお見せする予定です。また、ソースコードも公開する予定です。
(なお、以前作ったものはUNIX 6th Edition a.outインタープリタであり、PDP-11エミュレータではありません)
目的
ご存知かもしれませんが、UNIX 6th Editionの解説本を出版しました。

はじめてのOSコードリーディング ~UNIX V6で学ぶカーネルのしくみ (Software Design plus)
- 作者: 青柳隆宏
- 出版社/メーカー: 技術評論社
- 発売日: 2013/01/09
- メディア: 単行本(ソフトカバー)
- 購入: 56人 クリック: 1,959回
- この商品を含むブログ (29件) を見る
皆さんがUNIX 6th Editionの動作を容易に確認できる環境を構築したいというのが目的の一つです。ブラウザ上で動けば、それができると考えました。
また、私がコンピュータシステム全体の動作を確認したいという目的もあります。エミュレータを作るというのは、それを達成するための良い手段の一つだと思います。
Link
- http://pdp11.aiju.de/
- 私が作ったものよりも、とっても素晴らしい、JavaScriptで実装されたPDP-11エミュレータです
UNIX 6th システムプログラミング - init その4
はじめに
今回も引き続きinitのソースコードを見ていきます。今回でようやくinitも一段落です。
init
http://minnie.tuhs.org/cgi-bin/utree.pl?file=V6/usr/source/s1/init.c
前回のエントリで、single user modeの時の起動処理を確認することができました。
今回扱うコードは以下です。複数の端末が有効な場合(以降multi user modeと呼ぶ)の処理を見ていきます。
	fi = open(ifile, 0);
	q = &itab[0];
	while(rline()) {
		if(line.flag == '0')
			continue;
		for(all)
			if(p->line==line.line || p->line==0) {
				if(p >= q) {
					i = p->pid;
					p->pid = q->pid;
					q->pid = i;
					p->line = q->line;
					p->comn = q->comn;
					q->line = line.line;
					q->coms[0] = line.comn;
					q++;
				}
				break;
			}
	}
	close(fi);
	if(q == &itab[0])
		goto error;
	for(; q < &itab[tabsize]; q++)
		term(q);
	for(all)
		if(p->line != 0 && p->pid == 0)
			dfork(p);
	for(ever) {
		i = wait();
		for(all)
			if(p->pid == i) {
				rmut(p);
				dfork(p);
			}
	}
ttysファイルの処理
fi = open(ifile, 0);
ifileはttysファイルのパス名を表します。
char ifile[] "/etc/ttys";
ttysファイルの仕様をマニュアルで確認します。
http://man.cat-v.org/unix-6th/5/ttys
1行ごとに、各端末の設定を3文字で表します。
| 左 | 0:その行(端末)は無効 1:その行(端末)は有効 |
| 中 | 端末スペシャルファイルの最後の文字(端末のスペシャルファイルの名前は/dev/ttyX(Xは任意の文字)→init解説第一回のエントリで紹介したSETTING UP UNIX - Sixth Editionを参考のこと) |
| 右 | gettyプログラムに渡される引数 |
実際にttysファイルの中を見てみると、こんな感じになっています。
http://minnie.tuhs.org/cgi-bin/utree.pl?file=V6/etc/ttys
000
010
020
030
040
050
060
070
18-
090
0a0
0b0
0f0
0g0
0h0
0i0
0j0
0k0
0l0
0m0
0n0
0o0
0p0
0q0
0r1
0s0
0t2
0u0
このファイルの例では、/dev/tty8のみが有効になっています。/dev/tty8はシステムコンソール用端末です。おそらくsingle user mode用の設定ですね。multi user modeだと、/dev/tty8以外にもいくつかの端末が有効になるように設定されるのだと思います。(システムコンソール用の端末/dev/tty8は常に有効としなければならなかったはず)
while(rline()) {
rline()で、ttysファイルから一行読みだしているのだろうと推測できます。実際にrline()の中身を見てみます。
rline()
{
	static char c[4];

	if(read(fi, c, 4) != 4 || c[3] != '\n')
		return(0);
	line.flag = c[0];
	line.line = c[1];
	line.comn = c[2];
	return(1);
}
ttysファイルから4文字を読み出し、それが3文字+改行(\n)でなければ0を返します。フォーマットチェックですね。
読みだしたデータが妥当だった場合、グローバル変数lineに値を代入し、1を返します。このlineのデータを使って、init()の処理が継続されます。
while文の中を見ていきます。
	q = &itab[0];
	while(rline()) {
		if(line.flag == '0')
			continue;
		for(all)
			if(p->line==line.line || p->line==0) {
				if(p >= q) {
					i = p->pid;
					p->pid = q->pid;
					q->pid = i;
					p->line = q->line;
					p->comn = q->comn;
					q->line = line.line;
					q->coms[0] = line.comn;
					q++;
				}
				break;
			}
	}
3文字の左が0ならば、そのエントリを無視します。その次に例のfor(all)=for(p = &itab[0]; p < &itab[20]; p++)が続きます。現在は起動時の処理を想定しており、itabのエントリは全て空だという前提で見ていきます。
itabの先頭からttysの(有効な)エントリを詰めていきます。pとqの交換処理(itab中のエントリの位置交換)は何を想定しているのでしょうか? 再起動時用の処理? 古いitabエントリはitabの後ろに追いやられ、ttysから読みこんだ内容がitabの前半にくるように見えます。
itab[]の設定が終わった後の処理を見ていきます。
	close(fi);
	if(q == &itab[0])
		goto error;
	for(; q < &itab[tabsize]; q++)
		term(q);
ttysファイルを閉じ、ttysファイルに有効なエントリが何もなければエラーとなります(少なくともシステムコンソール用の端末が必要だから?)。そして、ttysファイルから読み込んで登録したエントリの後ろのitabエントリをクリアします。先ほどの古いエントリを後ろに追いやる処理は、ここの処理と関係がありそうです。古いitabエントリは全てクリアされる、ということのようです。
端末に対応したプロセスの生成
	for(all)
		if(p->line != 0 && p->pid == 0)
			dfork(p);
そして、itab[]に登録された有効なエントリに対し、dfork()を実行しています。dfork()の中身を見ていきます。
dfork(ap)
struct tab *ap;
{
	register i;
	register char *tty;
	register struct tab *p;

	p = ap;
	i = fork();
	if(i == 0) {
		signal(1, 0);
		tty = "/dev/ttyx";
		tty[8] = p->line;
		chown(tty, 0);
		chmod(tty, 0622);
		open(tty, 2);
		dup(0);
		execl("etc/getty", minus, p->coms, 0);
		exit();
	}
	p->pid = i;
}
dfork()はfork()を実行して、端末に対応したプロセスを生成する関数のようです。ここで、標準入力と標準出力をオープンしているのが確認できます。生成されたプロセスは/etc/gettyを実行するようです。次は/etc/gettyのソースコードを見ていこうと思います。
生成されたプロセスのIDはitab[]に登録されます。
initプロセス(proc[1])は、続いて下記のコードを実行します。
	for(ever) {
		i = wait();
		for(all)
			if(p->pid == i) {
				rmut(p);
				dfork(p);
			}
	}
ここが、カーネルのwaitシステムコールハンドラを読んだ時に出てきた「initプロセスが宙に浮いたプロセスを始末している個所」でしょう。wait()を永久に実行(for(ever)=for(;;))しているのが確認できます。(親プロセスが先に終了してしまい)中に浮いてしまったプロセスがexitシステムコールハンドラによりinitプロセスの子プロセスにされることと、waitシステムコールハンドラで子プロセスの後始末をしていることを思い出してください。
終了したプロセスが端末に対応したプロセスだった場合は、rmut()(utmpとwtmpを更新する関数)を実行した後に、dfork()を実行して再度プロセスを生成しています。再度プロセスを生成するということは、端末に対応するプロセスは(終了されたとしても)常に存在しないといけないということでしょうか。
まとめ
今回読んだ内容をまとめると以下のようになります。
- multi user modeの場合は、ttysファイルの有効なエントリに対応したプロセスが生成される
- このときに標準入出力がオープンされる(標準エラー出力はまだ)
- 生成されたプロセスは/etc/gettyを実行する
- itab[]は端末に対応するプロセスを管理するための配列
- initを実行したプロセスはプロセスの生成処理が終わると、宙に浮いたプロセスを始末するための無限ループに入る
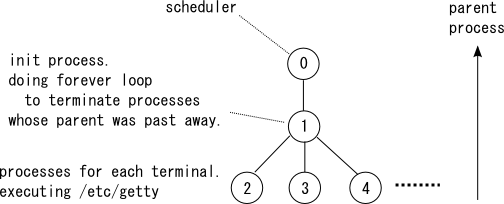
multi user mode時に、initを実行したプロセスが無限ループに入った時の、各プロセスの状態を絵で表すと以下のようになります。
というわけで/etc/initのソースコードを一通り確認することができました。カーネルプログラムの中身を知っているので、特に難しいところはありませんでした。もしカーネルのソースコードを読んでいなければ、何をやっているのかよくわからなかったでしょう。
カーネルのソースコードを読んでいるだけでは不明だった、標準入出力をオープンする処理と、proc[1]が宙に浮いたプロセスを後始末する処理も確認できました。やはり、カーネルプログラムとカーネルが提供する機能を使用したユーザプログラムの両方を追うと理解が深まります。
