XMLHttpRequestを使用したGoogle chrome extensionを作ってみたので、ソースを公開してみる
XMLHttpRequestを使ったGoogle chrome extensionを作ってみたのでソースを公開してみます。
詰まるポイントが結構あったので、メモも残しておきます。
作ったもの
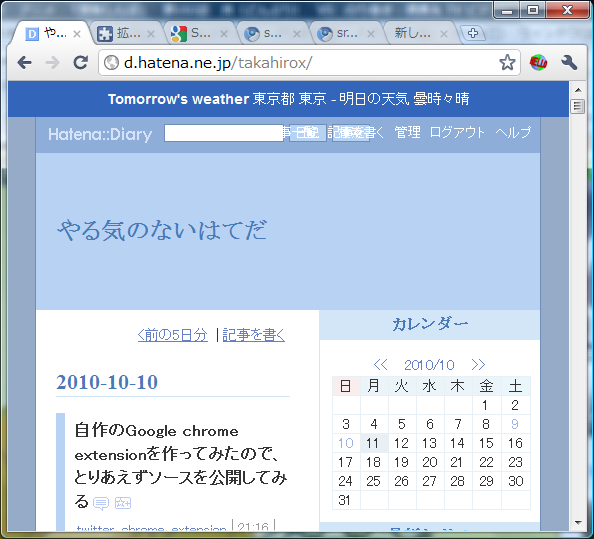
- webページ上記に東京の明日の天気予報を表示するGoogle chrome extension
- GoogleのSample Code(Cross-domain XMLHttpRequest from a content script)をベースにした
- livedoorの天気予報webAPIを使用
source code
manifest.json
permissionsの指定がポイント。
content_scriptでhttp://*/*を指定しているので、どのwebサイトを見ていても天気予報が表示される。
{
  "name": "weather forecast",
  "version": "1.0",
  "description": "display tomorrow's weather of Tokyo.",
  "background_page": "background.html",
  "permissions": [ "http://weather.livedoor.com/forecast/webservice/*" ],
  "content_scripts": [
    {
      "matches": [ "http://*/*" ],
      "js": [ "content.js" ]
    }
  ]
}
background.html
callbackのパラメータには、最初responseXMLを渡そうと思ったのだけれどもうまくいかなかった。JSONじゃないとダメ?
<!DOCTYPE html>
<html>
  <head>
  </head>
  <body>
    <script type="text/javascript">

      function forecast( callback ) {
        var xhr = new XMLHttpRequest();
        xhr.onreadystatechange = function( ) {
          if ( xhr.readyState == 4 && xhr.status == 200) {
            var title = xhr.responseXML.getElementsByTagName( 'title' )[ 0 ].textContent ;
            var telop = xhr.responseXML.getElementsByTagName( 'telop' )[ 0 ].textContent ;
            callback( { 'title' : title, 'telop' : telop } ) ;
          }
        }

        var url = 'http://weather.livedoor.com/forecast/webservice/rest/v1?city=63&day=tomorrow' ;
        xhr.open( 'GET', url, true ) ;
        xhr.send( ) ;
      }

      function onRequest( request, sender, callback ) {
        if( request.action == 'weather' ) {
          forecast( callback ) ;
        }
      }

      chrome.extension.onRequest.addListener( onRequest ) ;

    </script>
  </body>
</html>
content.js
ここはほとんどGoogleのsampleコードを流用。
function onText( data ) {
    var str = data.title  + ' ' + data.telop ;

    var weather_dom     = document.createElement('div') ;
    var title_dom       = document.createElement('strong') ;
    var text_dom        = document.createTextNode( str ) ;
    title_dom.innerText = 'Tomorrow\'s weather ' ;
    weather_dom.appendChild( title_dom ) ;
    weather_dom.appendChild( text_dom ) ;
    weather_dom.style.background = '#36b' ;
    weather_dom.style.color      = '#fff' ;
    weather_dom.style.padding    = '10px' ;
    weather_dom.style.position   = 'relative' ;
    weather_dom.style.zIndex     = '123456' ;
    weather_dom.style.font       = '14px Arial' ;
    document.body.insertBefore( weather_dom, document.body.firstChild ) ;
}

chrome.extension.sendRequest( {'action' : 'weather'}, onText ) ;
ポイント
制約
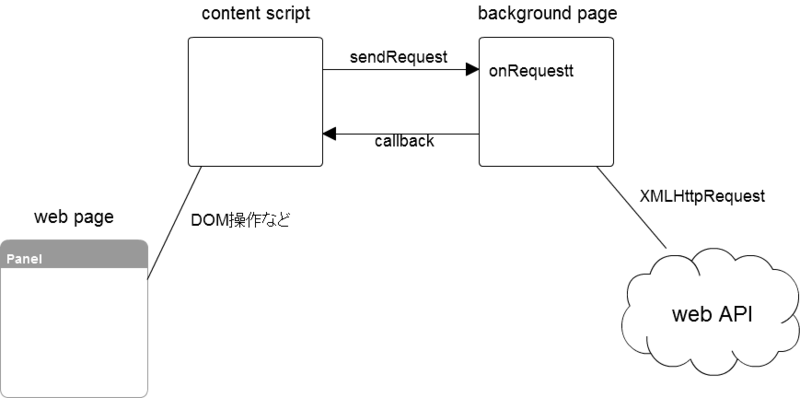
content scripts, background pagesではそれぞれできること、できないことがあります。
- content scripts
- WebPageのDOM操作などが可能
- XMLHttpRequestの使用不可
- background pages
- WebPageのDOM操作などは不可
- XMLHttpRequestなどを用いて外部と通信が可能
以上のことから、content scriptsとbackgroung pagesで通信をする必要があります。
基本構成は以下のようになります。
manifest.jsonの設定
XMLHttpRequestでアクセスする対象をpermissionsで指定する必要があります。
"permissions": [ "http://weather.livedoor.com/forecast/webservice/*" ],
また、content_scriptsのmatchesで、このextensionが動作するweb pageを指定する必要があります。
全てのweb pageで動作させたいので以下のように記述しています。
  "content_scripts": [
    {
      "matches": [ "http://*/*" ],
      "js": [ "content.js" ]
    }
background.html
content scriptsからのイベントを受け取るため、chrome.extension.onRequest.addListenerで登録します。
chrome.extension.onRequest.addListener( onRequest ) ;
content scriptsがsendRequestを実行したときに、requestを受け取るコードです。
      function onRequest( request, sender, callback ) {
        if( request.action == 'weather' ) {
          forecast( callback ) ;
        }
}XMLHttpRequestで外部のWebAPIを叩きます。
結果をJSON形式にしてcallback関数経由でデータをcontent scriptsに渡します。
content scripts側ではDOM操作などでWeb Pageに結果を反映します。
      function forecast( callback ) {
        var xhr = new XMLHttpRequest();
        xhr.onreadystatechange = function( ) {
          if ( xhr.readyState == 4 && xhr.status == 200) {
            var title = xhr.responseXML.getElementsByTagName( 'title' )[ 0 ].textContent ;
            var telop = xhr.responseXML.getElementsByTagName( 'telop' )[ 0 ].textContent ;
            callback( { 'title' : title, 'telop' : telop } ) ;
          }
        }

        var url = 'http://weather.livedoor.com/forecast/webservice/rest/v1?city=63&day=tomorrow' ;
        xhr.open( 'GET', url, true ) ;
        xhr.send( ) ;
      }
content.js
chrome.extension.sendRequestでbackground pagesに通信します。
chrome.extension.sendRequest( {'action' : 'weather'}, onText ) ;background pagesより呼び出されるcallback関数のロジックです。
XMLHttpRequestによって得られた結果が渡ってくるので、それを用いてWebPageに反映させます。
function onText( data ) {
    var str = data.title  + ' ' + data.telop ;

    var weather_dom     = document.createElement('div') ;
    var title_dom       = document.createElement('strong') ;
    var text_dom        = document.createTextNode( str ) ;
    title_dom.innerText = 'Tomorrow\'s weather ' ;
    weather_dom.appendChild( title_dom ) ;
    weather_dom.appendChild( text_dom ) ;
    weather_dom.style.background = '#36b' ;
    weather_dom.style.color      = '#fff' ;
    weather_dom.style.padding    = '10px' ;
    weather_dom.style.position   = 'relative' ;
    weather_dom.style.zIndex     = '123456' ;
    weather_dom.style.font       = '14px Arial' ;
    document.body.insertBefore( weather_dom, document.body.firstChild ) ;
}
最後に
外部との通信は、はまるポイントがたくさんあります。最初はGoogleのXMLHttpRequestサンプルを用いて、全体構成を把握するのがおすすめです。
外部との通信のやり方さえ理解できれば、多数あるWebAPIを用いてどんどんextensionを作ることができます!

